

Connecting Your Flockx Agent to Make.com: Technical Integration Guide
FlockX’s powerful AI agents can be extended beyond the platform through integration with Make.com. This guide walks you through the process of connecting your FlockX agent to Make.com, enabling automated workflows triggered by your agent’s intelligence.
Core API Connectivity
Prerequisites
Before connecting your agent to Make.com, you’ll need:
- Your FlockX API Token - how to get your api key
- Your Agent’s UUID - Your agent’s unique identifier (format:
e151675f-2d7c-46ee-a2a1-d68529adcb3d). You can find this in the web url of your browser e.g. https://agents.flockx.io/workbench/agents?agentId=82eee21b-089c-4aa5-b9a0-923c61ae712g - A Make.com account - Free or paid, depending on your automation needs
FlockX Agent API Endpoint
The primary endpoint for agent interaction is:
This endpoint accepts POST requests and returns your agent’s response.
Required Headers
Every API request to FlockX requires these headers:
Request Body Structure
The basic request body is simple:
Response Format
The API returns a JSON response containing your agent’s reply:
Setting Up Make.com Integration
Basic Make.com Scenario Creation
- Log in to your Make.com account
- Create a new scenario
- Select a trigger module that will initiate your workflow
Common triggers include:
- Webhooks (for form submissions, external systems)
- Scheduled events (for regular agent interactions)
- App-specific triggers (Gmail, Slack, etc.)
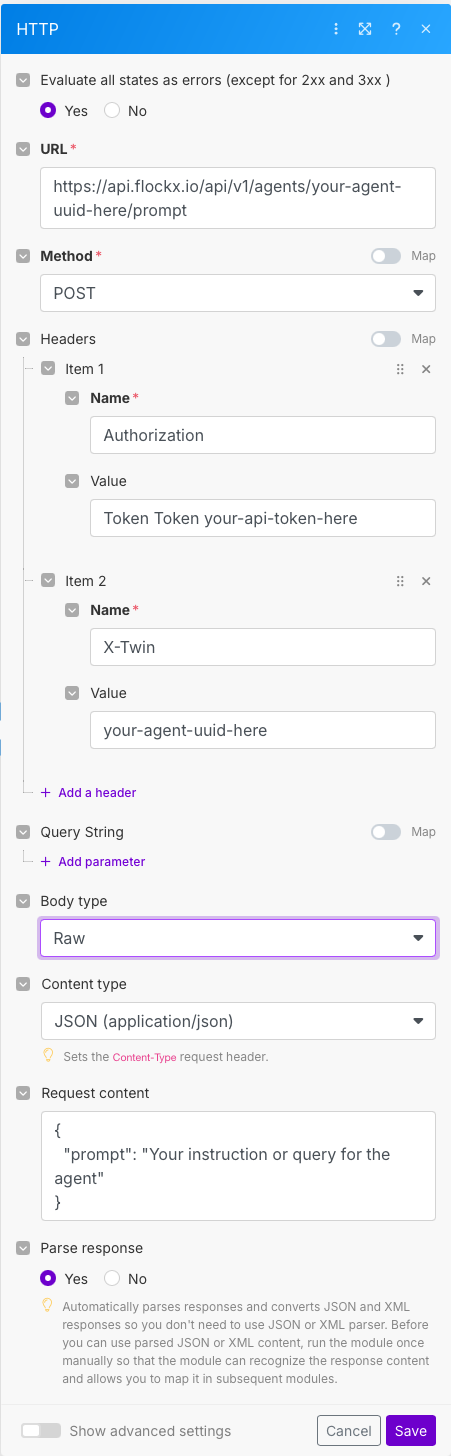
Configuring the HTTP Module for FlockX
After your trigger module, add an HTTP module:
- Click the ”+” icon after your trigger module
- Search for and select the “HTTP” module
- Configure the HTTP module:
- URL:
https://api.flockx.io/api/v1/agents/{your-agent-id}/prompt - Method: POST
- Headers:
- Body (type): JSON
- Body (content):
- URL:
Processing the Agent’s Response
Add modules after the HTTP request to process and use your agent’s response:
- JSON Parser module (optional): If you need to extract specific parts of the response
- Action modules: Email, SMS, CRM updates, etc.
Example Make.com Scenarios
Scenario 1: Automated Quote Generation
Trigger: Webhook (Form Submission)
- Webhook: Receives customer data from a quote request form
- HTTP Request to FlockX:
- Email: Send the agent’s response to the customer
- CRM Update: Create a new lead with the quote information
Scenario 2: Scheduled Follow-Up System
Trigger: Scheduler (Runs daily)
- Scheduler: Triggers at 9 AM daily
- Google Sheets: Get list of quotes sent 48 hours ago without response
- Iterator: Loop through each pending quote
- HTTP Request to FlockX for each pending quote:
- Email: Send personalized follow-up with agent’s response
- Google Sheets: Update follow-up date in tracking sheet
Advanced Make.com Integration Techniques
Decision Routing Based on Agent’s Response
Use Router modules to create conditional workflows based on your agent’s response:
- HTTP Request to FlockX: Get agent response
- Text Parser: Extract key information or intent
- Router:
- Route 1: Response contains “urgent” → Send SMS notification
- Route 2: Response contains “booking” → Create calendar event
- Route 3: Default → Standard email response
Implementation example:
Enhanced Context Building
Gather information from multiple sources before querying your agent:
- Multiple information modules: CRM, Calendar, Database
- Array Aggregator: Combine data from multiple sources
- Text Formatter: Structure the aggregated data
- HTTP Request to FlockX:
Implementing Multi-Step Conversations
For scenarios requiring back-and-forth communication:
- Initial Trigger: Webhook or app notification
- Database Module: Retrieve conversation history
- HTTP Request to FlockX:
- Database Module: Store updated conversation history
- Response Module: Send agent’s reply to appropriate channel
Best Practices for Make.com Integration
Security
- Store your API token and agent UUID as Make.com Data Stores or Scenario Variables
- Implement error handling for API failures
- Set up notifications for failed runs
Performance
- Use Aggregators for batch processing when possible
- Implement Filters to avoid unnecessary processing
- Consider scenario execution limits based on your Make.com plan
Prompt Engineering
- Structure prompts consistently
- Include all necessary context in each prompt
- Use variables to personalize agent interactions
Monitoring and Optimization
- Use Make.com’s built-in Logging for troubleshooting
- Set up Alerts for critical failures
- Review and refine prompts based on agent performance
Troubleshooting Common Issues
Next Steps
After implementing your basic integration, consider these advanced capabilities:
- Implement two-way communication flows: Allow your agent to both receive and send information
- Create scheduled maintenance tasks: Automate regular agent knowledge updates
- Build analytics dashboards: Track agent performance metrics
- Implement approval workflows: Add human oversight for critical decisions
By connecting your FlockX agent to Make.com, you’ll unlock powerful automation capabilities that extend your agent’s intelligence across your entire business ecosystem.
Connecting Your FlockX Agent to n8n: Technical Integration Guide
FlockX’s AI agents can be seamlessly integrated with n8n to create powerful, automated workflows. This guide provides step-by-step instructions for connecting your FlockX agent to n8n, enabling your agent to interact with external systems and trigger automated processes.
Core API Connectivity
Prerequisites
Before connecting your agent to n8n, you’ll need:
- Your FlockX API Token - Used for authentication
- Your Agent’s UUID - Your agent’s unique identifier (format: e.g.,
e151675f-2d7c-46ee-a2a1-d68529adcb3d) - An n8n instance - Self-hosted or cloud-based
FlockX Agent API Endpoint
The primary endpoint for agent interaction is:
This endpoint accepts POST requests and returns your agent’s response.
Required Headers
Every API request to FlockX requires these headers:
Request Body Structure
The basic request body is simple:
Response Format
The API returns a JSON response containing your agent’s reply: